The instructions below are for your IT Professional. Please share your Username and Password, so your IT will be able to log into www.tdo4endo.com and review all of the network documentation and installation instructions for TDO.
Please contact TDO if you have any questions.
Your computers must meet our “Minimum Software and Hardware Requirements” in order to install TDO.
Step 1 – Overview of the Network
TDO requires you to have a network installed in your office. You will also need to have a server properly configured to install and use TDO. We recommend that you use a Microsoft Windows network with TCP/IP protocol only.
It is not necessary to have any other network protocol to run TDO.
You may also have other networks installed, like Netware and LAN Manager. Ask your network administrator to help you create the same configuration in your network.
In this installation guide, we will assume that you are running a Microsoft TCP/IP network.
In order to easily install TDO on all workstations connected to your network, you will need to configure your server according to the instructions below.
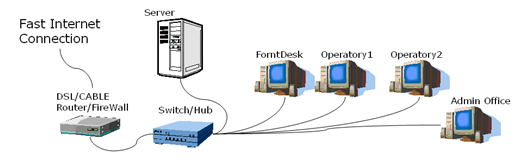
The following is a sample network diagram that will help you understand the basic concepts of each network element:
Stored on the server will be all TDO information, including information about patients, insurance, referring doctors, x-rays etc. All of the data saved on the server can be securely accessed and shared by all of the computers on the network.
A firewall protects your network from hacker attacks. Since your office requires an internet connection, you need to have this equipment to protect your data.
Step 2 – Creating the Main Server Folder
On your server, you will need to create a shared folder called “TDO” to which all other computers on your network will have access.
To “share” this folder, right click on the TDO folder, select “sharing” and “share this folder.” Type “TDO” into the “share name” field and click “OK” to finish.
Step 3 – Creating the Sub Server Folders
Create two new folders inside of the main TDO folder on the server. Name these folders TDOFFICEDATA and TDOBUILDS.
The TDOFFICEDATA folder will hold the database, pictures, letters and all of the other information that the system automatically generates.
The TDOBUILDS folder is where you will save and store the latest version of TDO or the latest TDO build (for example, TDOProfessioanlxxxxx.exe).
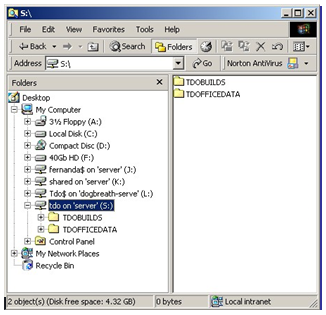
Step 4 – Mapping the Server Folder in Your Workstations
Note: With TDO 12 installing TDO to mapped drives is no longer best practice
After you have created and shared the TDO folder structure on the server, you will be able to browse the TDO folder from any computer on your network. We recommend that you map the TDO server folder and assign the letter “S:” to this mapping. After you have mapped the network drive, you will be able to see the two folders already created in the TDO shared folder on the server: TDOFFICEDATA and TDOBUILDS.
Note: You must assign the same letter to the TDO Server folder in all workstations.
Please be sure to map the drive by the server name and not the IP address.
You are now ready to install TDO! Please follow the installation instructions online by clicking TDO Version 12 Installation
Article ID: 301
Created: January 23, 2015
Last Updated: April 10, 2024
Author: TDO KB [web_admin@tdo4endo.com]
Online URL: https://kb.tdo4endo.com/article.php?id=301