[v12.373g and above] Google Calendar Sync - setup
Overview
This article explains how to set up synchronization of your TDO Calendar with your Gmail account.
NOTE: For information about the TDO Live Consult Feature (which works with the Calendar Sync feature), please refer to this article.
The information in this article applies to TDO versions v12.373g and above. Not all information will apply to older versions of TDO. Please visit the following linked article for further details: [v12.355x and below] TDO Google Calendar Sync.
Google has announced that starting in the Summer of 2024, they will begin the process of moving fully to OAuth with third-party apps in order to better protect their users. This transition will disable access to less secure apps. Less secure apps being "non-Google apps that can access Google Accounts with a username and password (basic authentication)." As TDO Google Calendar sync already utilizes OAuth, existing TDO users would simply have to allow TDO Calendar access to their Google Calendar. New TDO users may have to enter their email and password in Google to allow access.
For additional information regarding Google's update, please visit their article linked here - Google Help Center: Transition from less secure apps to OAuth.
Requirements
- Internet Access
- This feature will only work with TDO version 11.151b or higher.
- Google account to synchronize to. Will require authentication, described below
- Computer running Windows 7 or higher
- Only full access and admin users will be allowed to edit Google accounts.
- SetupTDOGoogleCalendar.exe: Download on TDO4Endo.com
- .NET 4.5 Framework, which can be downloaded on the Microsoft website by clicking here (External Link)
Synchronization Setup – TDO 12.373g and newer
Overview: TDO Google Calendar Sync has been improved to allow users to sync multiple accounts on one computer instead of multiple computers. As a reminder, the steps listed below apply only if you are using TDO Version 12.373g or newer. If you are using an older version of TDO, please follow the article here: TDO Google Calendar Sync
Note: the new setup does not require configurations on multiple computers. This feature is available in TDO 12.373g and newer
Detailed Instructions
- Open the Control Table for the office - Setup > Site Configuration > Edit Control Table
- Click on the Application Settings tab. Notice the button at the bottom of the screen that says “Google Accounts – Calendar Sync”.
- Click on the Google Accounts – Calendar Sync button. The Google Account Settings will display.

- Enter your existing Google email account and password. Select how many days ahead the system will synchronize the appointments. Keep in mind that this is Case-Sensitive, so ensure the e-mail account is listed exactly as it appears after logging in. Close the form and the Control Table.
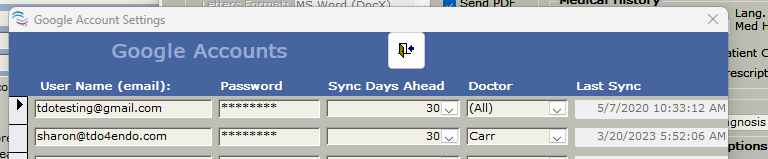
- Under Doctor, you can choose whether to sync by doctor or sync all (choose all or leave blank)
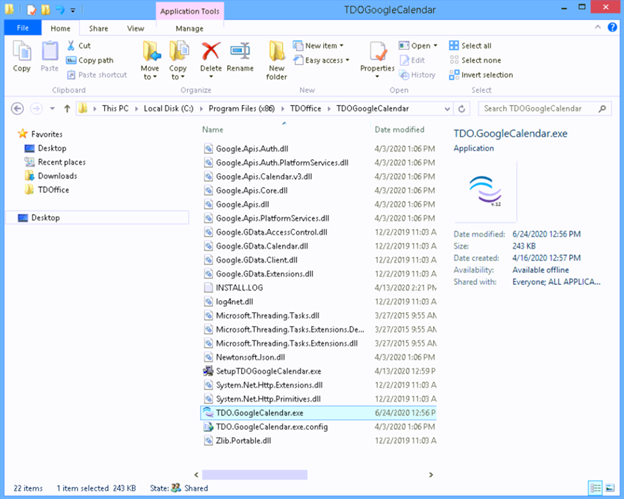
- On your computer go to C:\Program Files (x86)\TDOffice\TDOGoogleCalendar
- Double-click on TDO.GoogleCalendar.exe
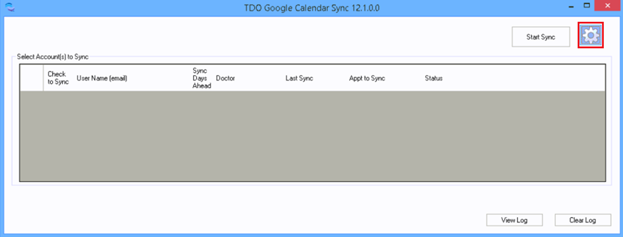
- TDO Google Calendar Sync window will open
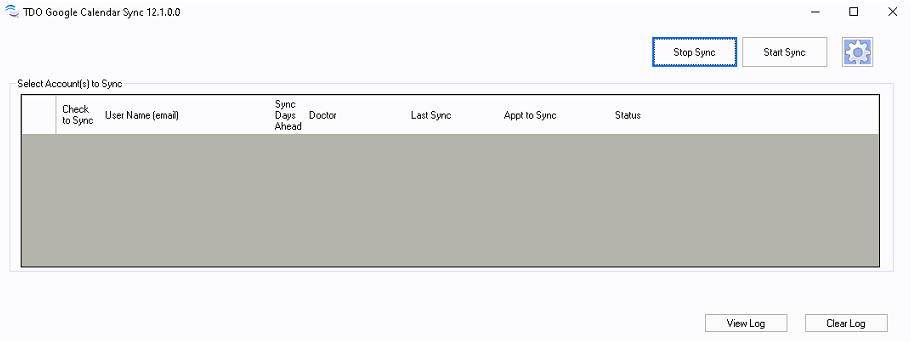
Note: if any accounts were already set up in the past, the accounts will show in this window.
- Click on the ‘gear’ icon located in the upper right corner to start the account(s) configuration
- Under “Edit Account,” enter the following information:
- Email address
- Password associated with that email address
- Sync Days Ahead: how many days ahead the system will synchronize the appointments
- Doctor

- Select the Google Account to sync appointments to
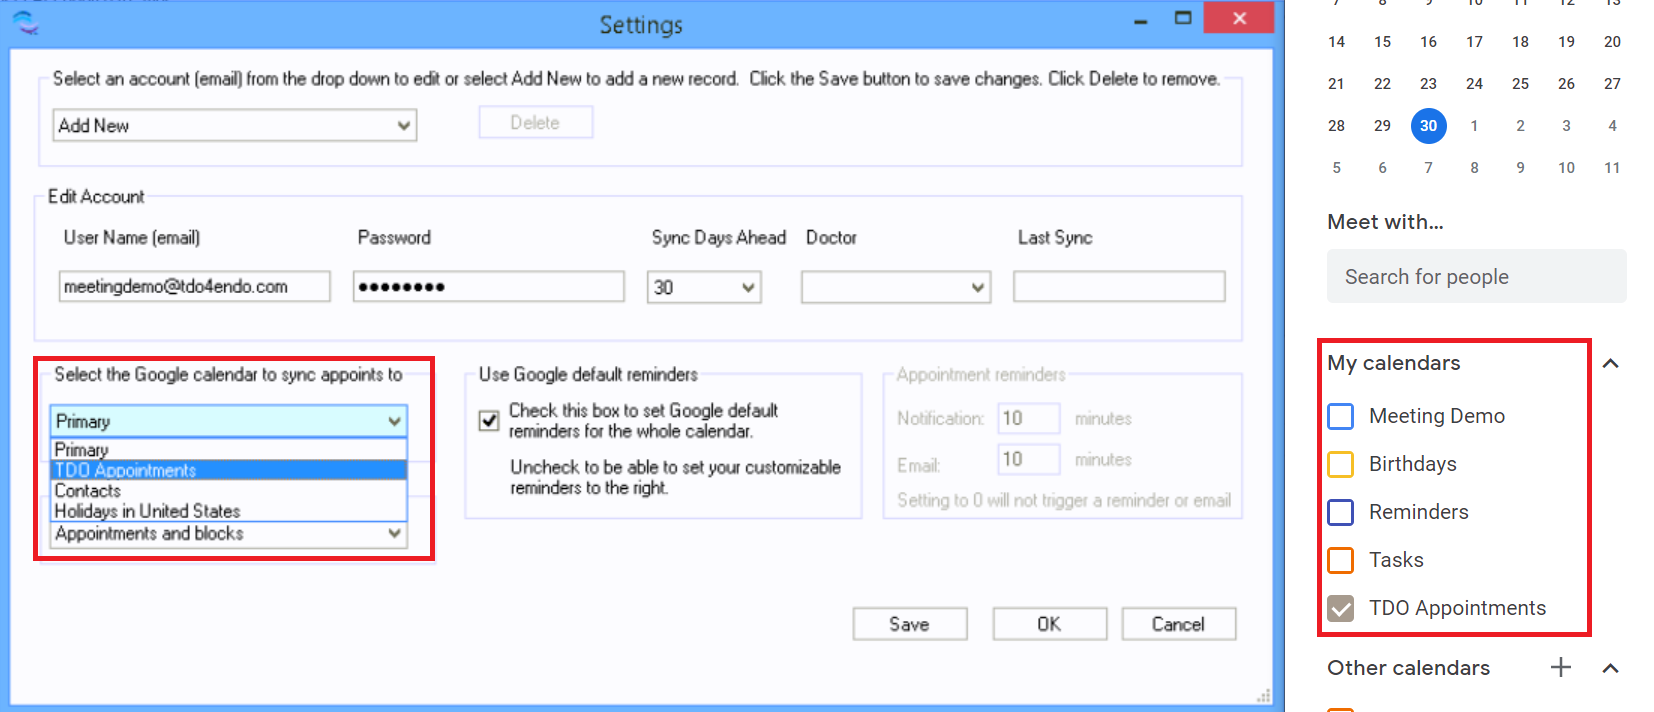
- This feature will allow you to choose the calendar they would like to use to sync their appointments.
- Notes: To set up a new calendar in Google Calendar, click here.
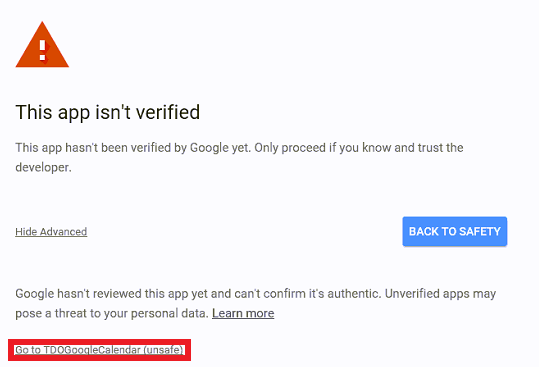
- If it's the first time setting up an account, users will be prompted to verify their account.
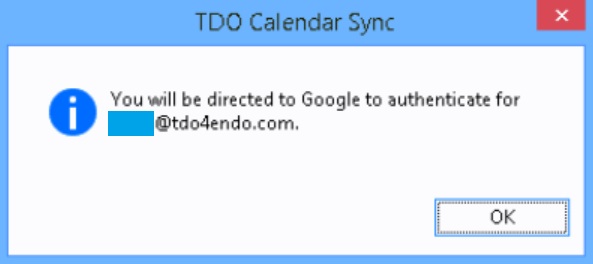
- Log on to your email account
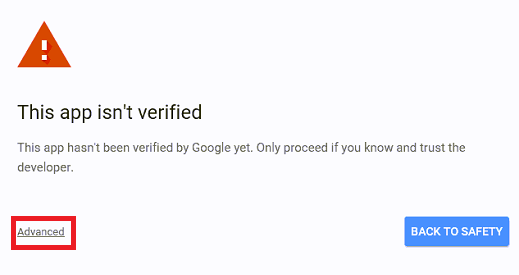
- If you receive a warning about the App not being verified, don’t worry. This application is safe; it just hasn’t been verified by Google yet. Follow the steps below by clicking Advanced and selecting Go to TDOGoogleCalendar.
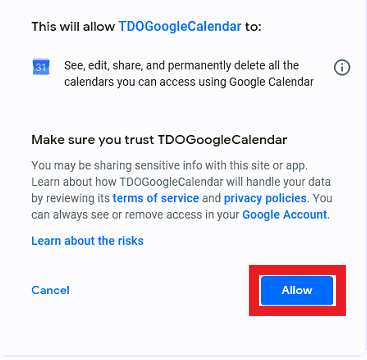
- Click Allow. The page may display an Authorization successful message or automatically close. Either result indicates that you have successfully given TDO access to synchronize appointments to your Google Calendar.
- Select appointments to synchronize. It will allow users to select the type of appointments they wish to sync.
- Appointments and Blocks: will synchronize all types of appointments, including “TDO Live Consult” and block appointments.
- Appointments only: will synchronize all types of appointments, including “TDO Live Consult”. It will NOT sync Block appointment.
- TDO Live Consult Appointments only: will synchronize those appointments scheduled for TDO Live Consult only. This excludes any other types of appointments and block appointments.

- “Use Google default Reminders” and “Appointment Reminders”
-
If you check the ’Use Google default reminders’ box, every event synchronized to your Google Calendar will use your Google Calendar’s default event notification settings (so if you have many appointments, you’ll receive many notifications).
To change the default event notifications for your Google Calendar, see this link.
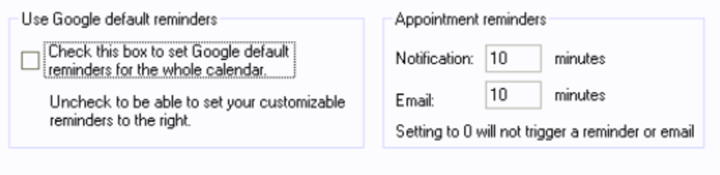
Leaving this box unchecked will allow users to customize whether (and what types) of reminders are created for the events that are synchronized to their Google Calendar. You can choose to receive a notification (displayed on any devices logged into that account), and/or an email reminding you about your upcoming events. You can also choose to receive neither by entering 0 in both fields.
- Click on the “Save” button to save the changes
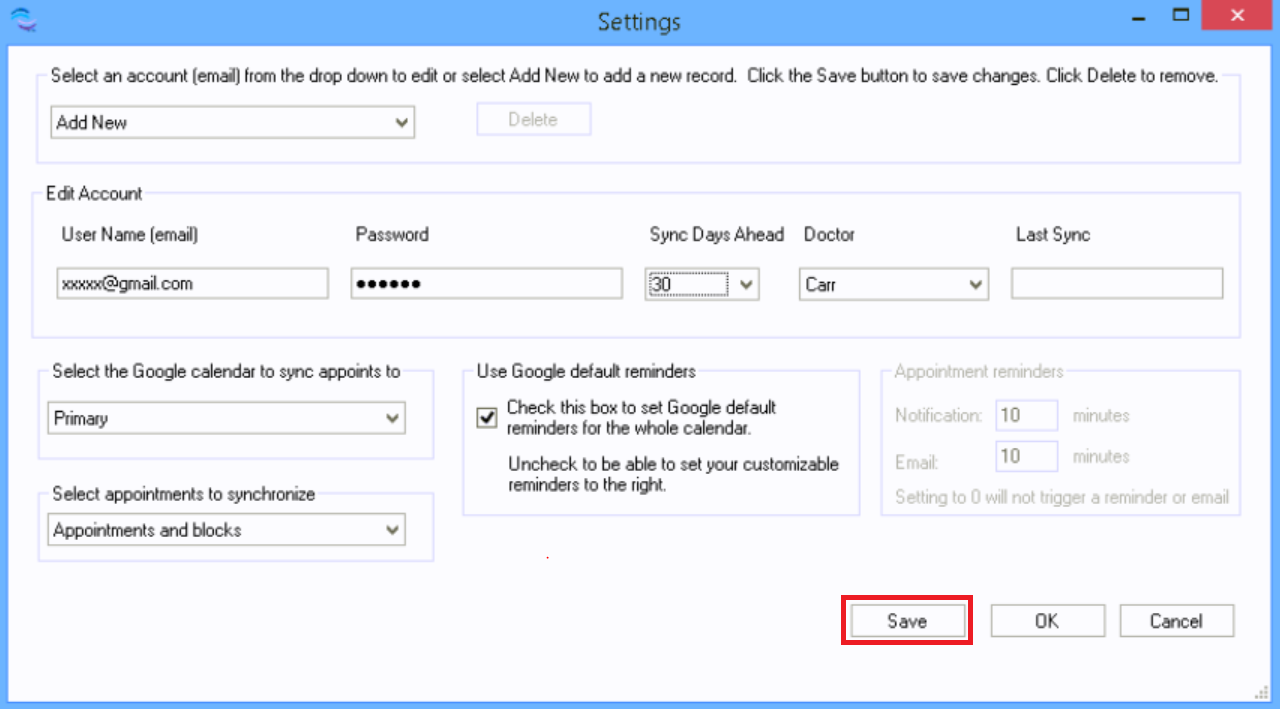
While the Settings window is open, users can add more accounts to synchronize by clicking on “Add New” at the top and follow the steps above for the new account.
NOTE: Setting one account for multiple users is not supported.

- While the Settings window is open, users can delete an account they no longer wish to synchronize by selecting the account and clicking the “Delete” button.

- Click on “OK” Once the configuration is completed to close the settings window.
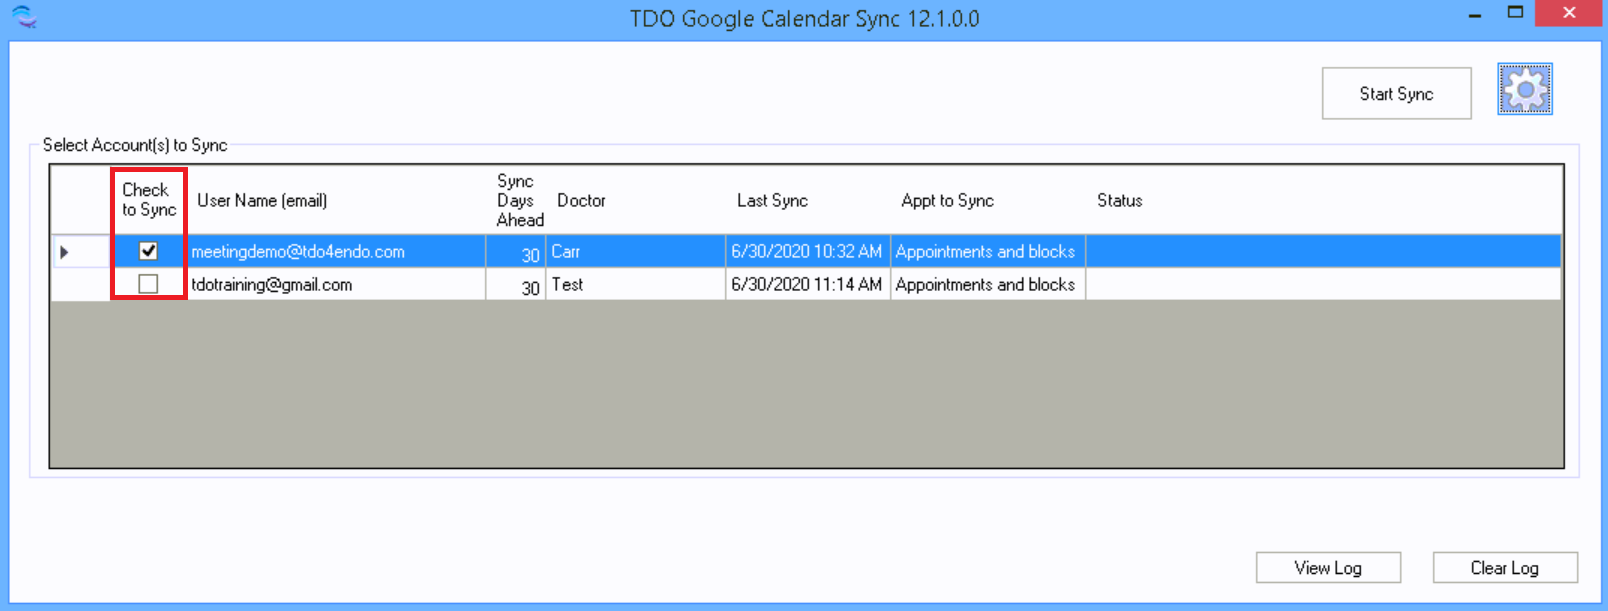
- Back on TDO Google Calendar Sync window, users will be able to check the account they wish to sync by checking the box for
“Check to Sync”.
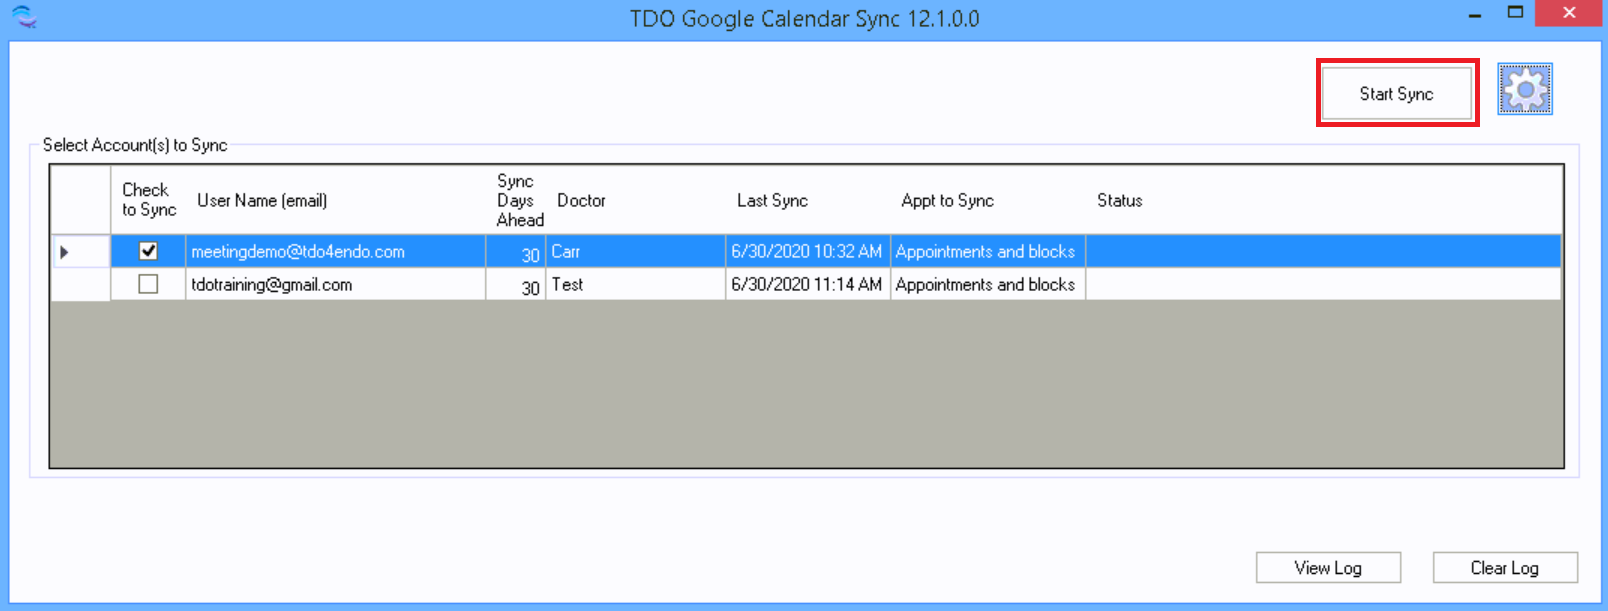
- Click on “Start to Sync” button to start syncing the appointments and/or blocks
Article ID: 833
Created: July 20, 2020
Last Updated: November 24, 2025
Author: TDO KB [web_admin@tdo4endo.com]
Online URL: https://kb.tdo4endo.com/article.php?id=833