Formatting the Calendar View
Estimated Reading Time: 3 MinutesOverview
TDO allows each employee to have their own Calendar view.
Detailed Instructions
When a new employee joins the practice, if you would like to set their calendar (schedule) view to match another employee(s), please log into an account with the desired calendar view and go to Setup > Program Setup > Formatting. Choose the username you would like to adjust in the Copy settings to another user and select Copy Current Options Only or Copy All Options, depending on what you would like to copy. *Do NOT click set options to default, as that will reset the logged-in user to TDO defaults.

If you would like to adjust the way an appointment is formatted on the Calendar, you can do so by clicking Program Setup and then selecting Formatting.
This will bring up the Formatting Options menu:
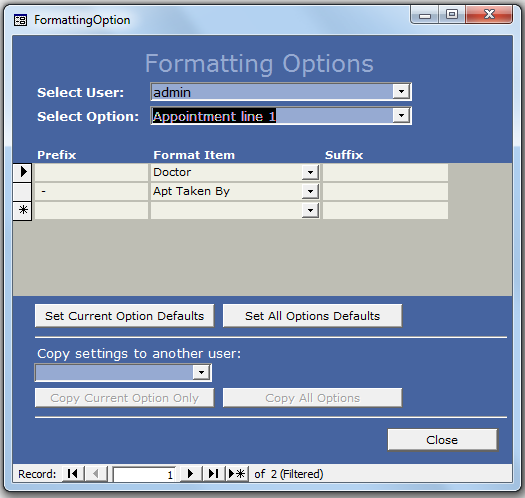
By default, the username currently logged into TDO will show in the Select User dropdown box. Find the user you would like to adjust the appointment formatting for and next in the Select Option dropdown and choose the line you would like to adjust.
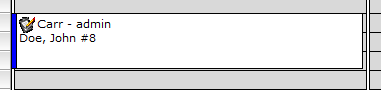
Appointment Line 1 – this is the information shown on the first line of an appointment on the calendar. This line is only one line in length – does not wrap.
Appointment Line 2 – this is the information shown on the second and the rest of the lines of an appointment on the calendar. This line does wrap to the 3rd and 4th lines so you may enter more information for this item.
Appointment Details – this is the information shown on the calendar in the box on the left after an appointment is selected.
Image Descriptions – Text below images on image organizer.
Image Tooltips – Text in tooltip when you hover over an image on the image organizer.
Image in lecture Descriptions – Text below lecture images in the image organizer. For lectures, you may choose not to have the patient’s name.
Image in Lecture Tooltips - Text in tooltip when you hover over a lecture image in the image organizer. For lectures, you may choose not to have the patient’s name.
Date/Time Stamp – Text that shows on an image when it is stamped.
To edit any of these items, pick it from the ‘Formatting Option’ combo box and the current settings will show in the lower section of the form.
Select or change the item you would like to have show. You may enter a prefix or suffix as well which will show before or after the selected item. Use the prefix and suffix fields for spaces, commas, # signs and dashes.
If you are editing an item that allows multiple lines, you have the option to set a line break. By clicking this box it will start the next item on a new line.
If you would like to revert your settings back to the default options that came with the program simply click the ‘Set Current Option Defaults’ button to revert only the selected formatting option or click ‘Set All Options Defaults’ to set all of the formatting options back to the program defaults.
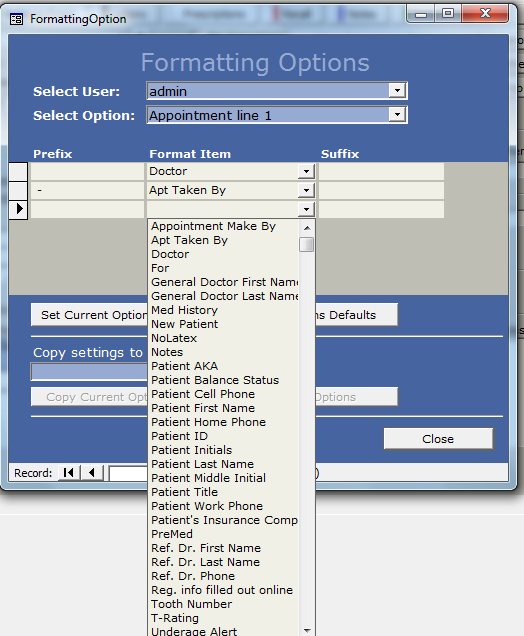
The Format Icon dropdowns will show you the items that can be added to the appointment as they show on the Calendar
Once you have adjusted your formatting settings to look how you would like, you can also apply these settings to any other member of staff in your office.
To copy settings, choose the username you would like to adjust in the Copy settings to another user and select Copy Current Options Only or Copy All Options, depending on what you would like to copy.