Grouping Images by Patient in Organizer
Estimated Reading Time: 1 MinutesOverview
This feature was implemented in TDO to make it easier for users to see all the images grouped by patient.
Note: This feature was implemented in TDO Version 12.236
Detailed Instructions
- Make sure TDO is closed.
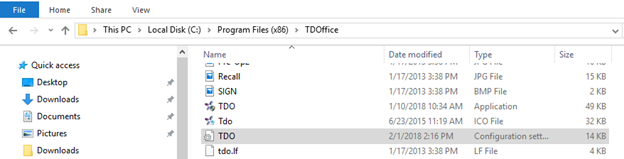
- Go to “C:\Program Files \TDOffice” (32-bit) or “C:\Program Files (x86)\TDOffice” (64-bit) and double-click on "TDO.ini"
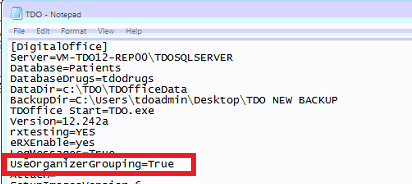
- Add the following code: UseOrganizerGrouping=True
- Save the changes and close TDO.ini window.
- Log on to TDO and open Organizer.
- Select “All Patients”

- On the “Sort” dropdown list, users will see new options: “Grouped Patient” and “Grouped User Defined”.

- Select “Grouped Patient” or “Grouped User Defined”.

- Organizer will show the images grouped together by Patient. The patient’s name will show on Organizer ordered by: last name, first name then the images for that pt will show below.

- When dragging images within the same patient, the position of the image will be moved to the new position.

- New Position

- When dragging images from one patient to another, the image copies from the originally saved patient chart to the patient you want the image to go to. When copying the image from one pt to another, you will see the "Missing Information" window to select the image category and the tooth number.

- After the image was dragged to another patient.
