PreXion3D Expedition CBCT Scanner Integration
Estimated Reading Time: 1 MinutesOverview
The integration for Prexion is available in TDO Version 12.202 or higher.
Detailed Instructions
Click on the Setup tab > Select Site Configuration > Device Configurations
Apply the CBCT Settings to the assigned workstation name
*Computers that are only viewing the 3D images do not need the PreXion Scanner and PreXion Drop Folder filled in*

Default CBCT Image Category: if you do not have a CBCT image category, it can be created by going to Setup > Program Setup > Image Categories
PreXion Scanner: C:\PX2Console
PreXion Viewer: C:\PreXion3DViewer
PreXion Screenshot Folder: F:\OutputJPEG\DeltaImage (MUST have a mapped network drive for this path)
PreXion Drop Folder: This is the folder where patient information is passed to the Scanner, it should be C:\PMS_SRC
PreXion > TDO Plugin Setup
-
Download prexionplugin.zip and extract the contents.
-
In the ‘ippi-5.1_libguide40’ folder, copy all 4 files (ippcore-5.1.dll, ippi-5.1.dll, ippiw7-5.1.dll, libguide40.dll) to C:\Windows\syswow64 (or system32, if on an x86 machine).
-
In the ‘setupTDOforClientPC’ folder, copy PXDcmJobProc.cfg to C:\PXDcmBackup\config\ (create this path if it does not exist).
-
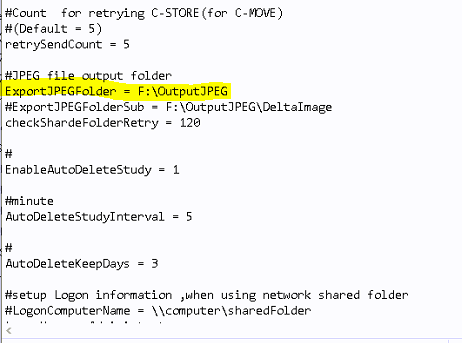
Open C:\PXDcmBackup\config\PXDcmJobProc.cfg in Notepad and CTRL+F to search for ‘ExportJPEGFolder’.
-
Make sure this line matches the screenshot below.
Acquiring a Scan
See this article for instructions on how to acquire a scan.
Troubleshooting
If you require any assistance from PreXion to help troubleshoot conebeam setup or acquisition, please check the following external link: