Carestream - CBCT - saving screenshots into TDO
Estimated Reading Time: 1 MinutesOverview
The article below reviews the steps to save a Carestream CBCT screenshot into TDO. If you are experiencing issues with this function, it is also advisable to review the following steps to ensure everything is set up correctly. Once a CBCT volume is acquired, users can take as many screenshots as necessary. If the volumes are open from TDO, screenshots taken on Kodak 3D Viewer will automatically be saved in TDO.
CS 3D Imaging Software version 3.10.38 or newer is recommended
Detailed Instructions
The following steps must be manually applied to each computer that is intended to be used to capture Carestream CBCT screenshots and saved into TDO.
- Within the Carestream Viewing Application, select Settings (shaped like a gear)
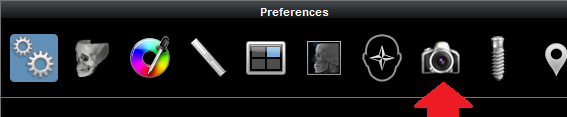
- From the Preferences options, select Screenshots (shaped like a camera)
- If Save a copy in the specified folder is checked off, uncheck it
- Underneath the Screenshot format section, select TIFF
- Click Apply to save the changes
- Close the Carestream application
Saving Carestream screenshots into TDO
There are two (2) methods of taking screenshots that can be saved automatically in TDO:
Method 1: immediately after CBCT acquisition
- From the TDO Acquire window, select the CBCT button to take a new CBCT
- After the CBCT has been acquired, within the Carestream application, set up what you'd like to screenshot and click Screenshot (camera icon)
- The screenshot will automatically save into the TDO Image Organizer
Method 2: existing CBCT
- From the TDO Image Organizer, open the CBCT volume that you'd like to screenshot, either double-clicking or right-clicking and selecting Open Volume
- From the Carestream application, set up what you'd like to screenshot and click Screenshot (camera icon)
- The screenshot will automatically save into the TDO Image Organizer