Overview
This article will guide you through how to update your TDO from an existing version of TDO 12 to the latest version of 12.
For directions on how to install TDO - not update the program - on a server or computer, please visit the following linked article: KB 643.
Offices that are currently on TDO version 11 and/ or are a replicated office wanting to upgrade, please stop here and contact TDO Support. If you are not sure if either of these apply to your office, please contact TDO Support to confirm.
Prerequisites
Before we begin the update, there are a few things we want to do.
- Review KB 619 to confirm all minimum software & hardware requirements are meet for version 12: TDO installation - update requirements
- Ensure TDO is closed on all workstations - TDO will be temporarily non-functional during the upgrade process
The following steps are best done on the server computer:
- Run a manual backup of the TDO database by going to C:\Program Files (x86)\TDOffice\DotNet\TDO.Utility.Backup.exe
- Right-click TDO.Utility.Backup.exe and select Send To and then click Desktop
- Locate the Backup Utility shortcut (TDO.Utility.Backup.exe) that was created on your Desktop, right-click and select Properties
- Under the Shortcut tab, in the Target window, without editing the existing path, add a space and "/ui" after what already is in the window

- Click Apply to save and OK to close the window
- On the Desktop, right-click New and select Folder - name this "TDO Backup"
- On the Desktop, open the Backup Utility shortcut (TDO.Utility.Backup.exe)
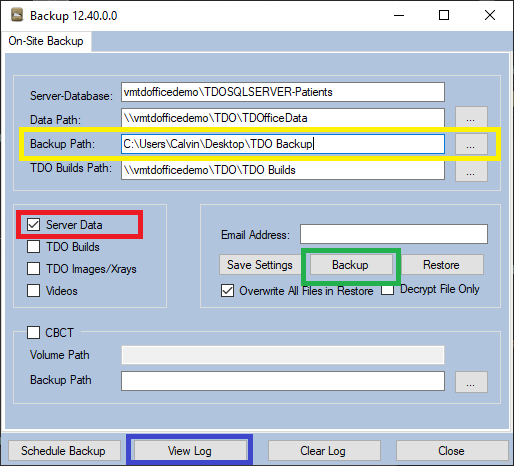
If, after completing the above steps and opening the Backup Utility shortcut, it does not open the User Interface (UI) (seen in the following image) then close the window that opened and double check that the Target window path is set with a space and "/ui" (no quotation marks around /ui).
- Within the Backup Utility window update the below two (2) items:
- Highlighted in Yellow: In the Backup Path window use the ellipses (...) to navigate to the newly created "TDO Backup" folder on the Desktop
- Highlighted in Red: Ensure that only Server Data is checked off (doing so will only backup the database which is what we want)
- Highlighted in Green: Click Backup
- Highlighted in Blue: To confirm the backup completed successfully, "without error," open the Backup Utility shortcut and click on View Log
- Scroll to the bottom of the backup log - the last line should read "Backup completed without errors"
|
 |
If the backup does not say "completed without errors" or says "completed with errors," please contact TDO Support.
The following steps must be done using an Internet Browser:
- Navigate to the TDO4Endo website: https://tdoer.tdo4endo.com
- Using the doctor's TDOer login credentials, login
- Once logged in, select Download TDO
- Scroll to and click UPGRADING TO THE LATEST VERSION OF TDO? CLICK HERE! - a list of files needed for the installation will appear
- Download each file and place it within the "TDO Builds" folder on the server
|
The following steps must be done within the TDO application:
- Launch & log into TDO
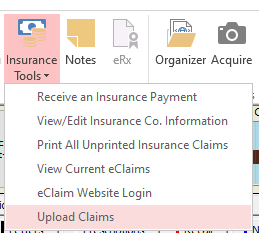
- Under the Main Ribbon Menu select Insurance Tools
- Select Upload Claims - if this is greyed out then there are no claims needing to be uploaded
- Close TDO
|
 |
Instructions
Server Update
- On the server, navigate to the "TDO Builds" folder where the installation files are saved
- Run TDOProfessional124xxx.exe to install the latest TDO build
- Read through the License Agreement, if you agree, click I Agree to proceed with the install
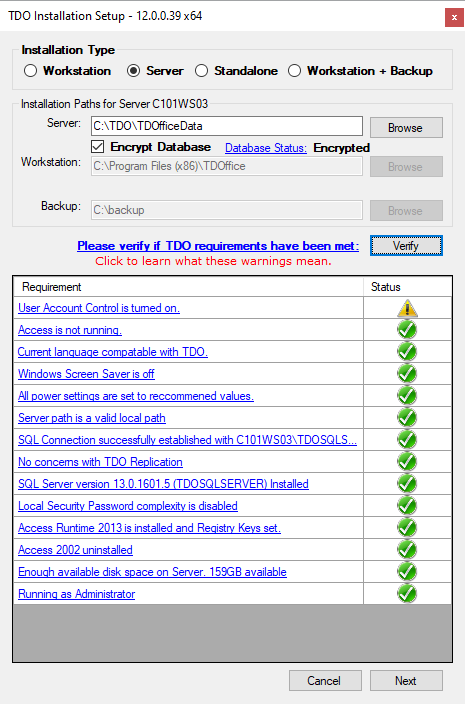
- Under the Installation Type section, select Server
- Click Verify - this will prompt the installer to check and generate a list of requirements necessary for TDO to run
- Click Next to proceed with the installation - if there are any red X marks, the Next button will remain greyed out and unclickable until they are cleared
- Let the installer run
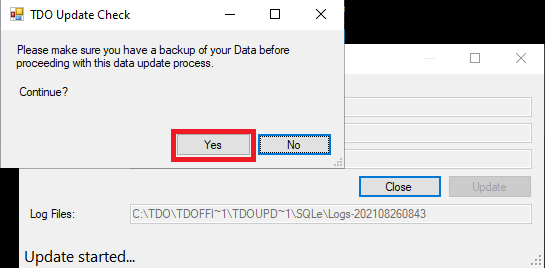
- A TDO Update Check window (shown below) will pop up in the bottom right of the screen, click Yes to proceed
- If the installation prompts for a reboot, proceed with restarting the computer - should issues persist call TDO Support
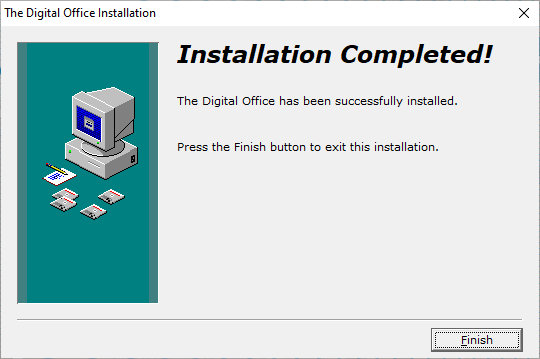
- Once the process is complete, the window will read "Installation completed!"
- Optional: If the office intends on using the TDO application on the server, then TDOProfessional124xxx.exe must be ran again on the server using the below Workstation(s) Update steps
|
|
|
Workstation Update
Now that the server is updated, the workstations can be updated. These steps need to be performed on each workstation. Workstations that are not updated will error stating the workstation database version does not match the server version.
- On the workstation, navigate to the server path where the "TDO Builds" folder and installation files are located
- Run TDOProfessional124xxx.exe to install the latest TDO build - must be same version as server
- Read through the License Agreement, if you agree, click I Agree to proceed with the install
- Under the Installation Type section, select Workstation
- In the field Server, enter the UNC path to the "TDOfficeData" folder on the server
- Click Verify - this will prompt the installer to check and generate a list of requirements necessary for TDO to run
- Click Next to proceed with the installation - if there are any red X marks, the Next button will remain greyed out and unclickable until they are cleared
- Once the process is complete, the window will read "Installation completed!"
- Repeat "Workstation Update" steps on all remaining workstations
|
 |
|
Troubleshooting
Reference the following linked article when troubleshooting TDO installations: TDO installation - troubleshooting.